


i didn't have a lot of content to copy over so I did it wireless. I also need to upgrade the micro SD card in the new system... eventually. Sucks it needs a screw driver. I prefer digital games, but I also like that the 3DS has catridges, so...
A Second Farewell to BaD - How to Set up Your New 3DS XL

|
On 03/01/2015 at 06:31 PM by mothman See More From This User » |
So as I've mentioned my plan worked and I was able to pick up a New 3DS XL for no out of pocket expense. Ok, that's kind of a lie, I had to pay $1.45. LOL
So I'm now the proud owner of a red XL and I'm all set for Xenoblade. That and I won't get headaches from the tiny screen anymore.
First for those of you considering an upgrade from your Not New 3DS here's what you need to know.
The MicroSD Card
The New 3DS uses a MicroSD card. It comes with a 4 GB installed but if like me you have more than 4 GB of digital games that won't cut it,
If you've been using a standard SD card in your current 3DS you will need to buy a MicroSD if you have more than 4 GB.
If you were really smart and predicting the future have been using a MicroSD in a standard SD shell congratulations. You have just cut a lot of time off the transfer. You can basically do a system transfer without moving any data and then install your card in the new unit.
The System Transfer
The system transfer is fairly painless but if you have lots of digital content on a standard SD card you absolutely have to have a PC to copy the games. Yes it will allow you to copy everything directly to your new unit via wireless but that will take forever and heaven forbid should you lose connection between the two devices while attempting the transfer.
Luckily the System Transfer provides you with options and one is to just copy your account and let you transfer the games using your PC.
You need your old 3DS and your New 3DS XL in close proximity to each other and connected to the interwebs.
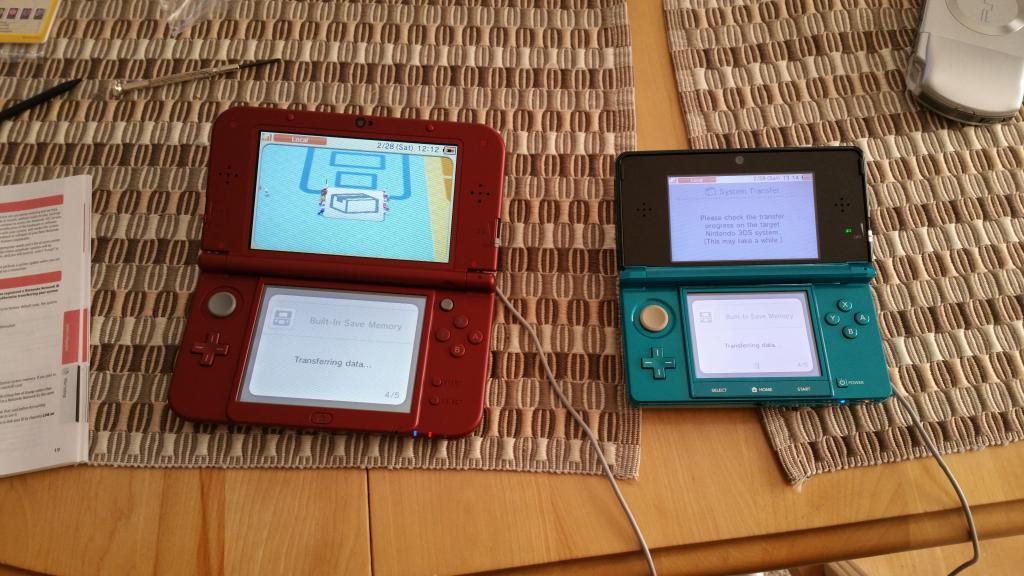
The System Transfer option can be easily found under System Settings on both units.
Once you get that far on your old system it will give you 3 options. If you are really feeling lazy you can choose to transfer everything wirelessly. If you are going to do this you can install your new Microsd card into the New 3DS or if you have less than 4 GB you don't need to install anything. Just copy away but keep in mind the process will be slow.
Using the PC to Copy Your Games
In my case I had a standard SD card with 10 GB of Games installed. This was my process.
1. Perform the system transfer choosing option 3 to copy files via PC. This process simply copies your account and setting but does not copy the games. It does however copy any DSIware games from system memory onto the old SD card so don't take the card out until the system transfer is complete. I didn't even know the DS files were in system storage so I learned something new.
2. After the system transfer is finished remove the SD card from your old 3DS and put it into the flash card slot on your PC.
3. Copy the folders on the SD card to a folder on your PC. In my case I had DCIM (for pictures) and Nintendo 3DS. These are the folders you must copy back to the root of the new card.
4. Once finished removed the card from your PC and insert the new MicroSD card. You will probably need to have a standard SD shell because most PCs will not accept the MicroSD. Do not even think of shoving that tiny card into the large multicard slot or you are likely to lose the card and render the slot unusable. Yes you may think of a way to get the card out again but it could be a pain in the ass so don't do it
5. Copy the folders from step 3 to the new card. This will take longer than copying them to the PC but not nearly as long as doing the wireless transfer. The folders you copy back must be at the root. i.e. if you created a folder called 3DS on your PC do not copy that folder to the new card. Only the folders below it e.g. DCIM and Nintendo 3DS
6. I strongly suggest you don't just yank the card out of your PC. Use the proper method for ejecting external media or your new card could wind up blank and you'll have to do it again.
7. Once it is out, remove it from the shell and you are all ready to install it in your new 3DS.
And oh yes I do mean install. Unlike the old model the MicroSD card slot is under the back cover where the battery is.
8. Find yourself a teeny tiny screwdriver and follow the instructions in the manual. Yes folks I am going to make you RTFM. Note: The screws are not supposed to come all the way out. Just loosen them enough to pry the case off.
This is what the unit looks like with the back off.
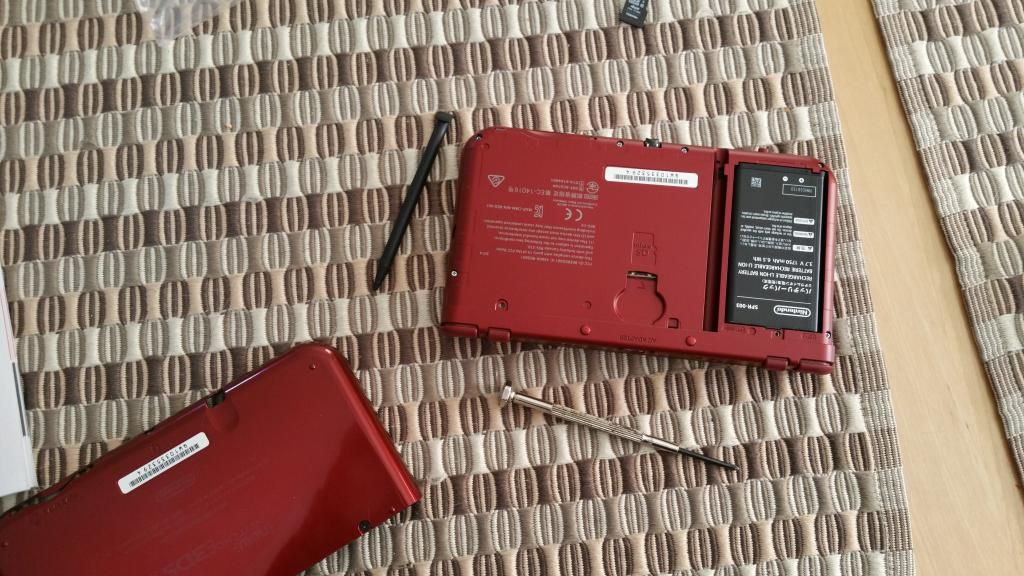
Be gentle removing the back so you don't crack the case. The microSD slot is in the middle of the back end of the 3DS as you can see here.
9. Get the back on again and Bob's yer uncle.
I managed to get everything over without any loss.
Hope this helps.


Comments